
Welcome to our comprehensive guide on ecommerce tracking setup in Google Analytics 4 (GA4) using Google Tag Manager (GTM).
With the recent farewell bid to Universal Analytics and the advent of GA4, businesses have gained access to a new era of advanced tracking and analytics.
It offers a plethora of powerful features that provide a deeper understanding of customer behavior, enabling data-driven decision-making to optimize online store performance.
Ecommerce tracking is a vital aspect of any online business, as it allows you to measure and analyze user interactions throughout the customer journey, from product views to successful purchases.
However, with the shift from Universal Analytics to GA4, ecommerce implementation has evolved.
Many merchants find themselves facing new challenges when it comes to setting up ecommerce tracking effectively.
In this blog, we’ll guide you through the process of setting up purchase tracking in Google Analytics 4 using Google Tag Manager (GTM).
Google Analytics 4 (GA4) is a powerful tool that allows ecommerce businesses to track and analyze their online sales and customer behavior.
Purchase Tracking Setup in GA4 provides valuable insights into the performance of your online store and helps you make data-driven decisions to grow your business.
What is Google Analytics Ecommerce Tracking?
Google Analytics Ecommerce Tracking is a feature provided by Google Analytics, a web analytics service offered by Google. It allows website owners and marketers to track and analyze the performance of their online stores and ecommerce activities. By implementing Ecommerce Tracking on their websites, businesses can gain valuable insights into customer behavior, sales trends, and revenue generation.
Key features of Google Analytics Ecommerce Tracking include:
- Transaction Tracking
- Product Performances
- Shopping Behavior Analysis
- Conversion Tracking
Google Analytics Ecommerce Tracking, businesses can gain a comprehensive understanding of their ecommerce performance, identify strengths and weaknesses in their sales funnels, optimize marketing efforts, and make data-driven decisions to improve overall online sales and revenue.

Struggling to Increase Your Website Traffic? Discover How Our Experts Can Help!
Say goodbye to traffic struggles and hello to exponential growth.
Schedule a consultation today and let our experts guide you towards website success!
Book a CallStep-by-step Guide on How to set up Ecommerce Tracking in GA4
Step 1: Create a GA4 Property If you haven’t already, create a GA4 property for your website by logging into your Google Analytics account and clicking on “Create Property”.
Fill in the required information, such as your website name and URL, and select the type of data you want to track (e.g. website, app).
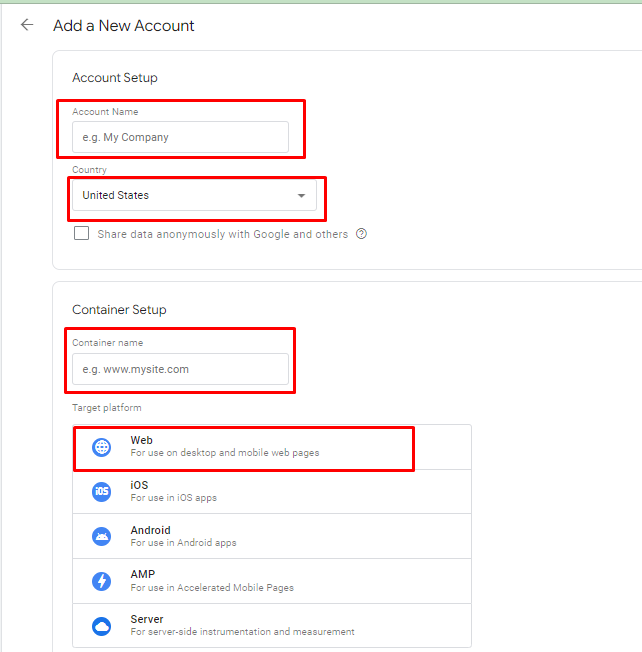
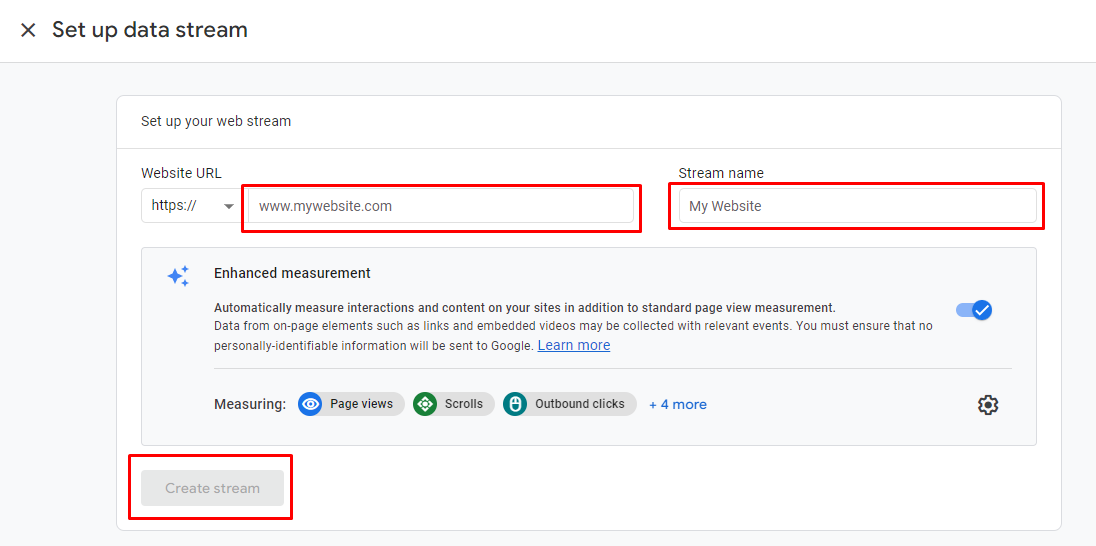
Step 2: Enable Ecommerce Tracking in GA4 Once you have created a GA4 property, navigate to the “Data Streams” section and click on the “Add Stream” button. Choose “Web” as the data stream type and provide a name for your data stream. 
Are you still grappling with Google Analytics 4 E-commerce tracking? Feeling confused how to set it up for your business’s success? Don’t worry – Reliqus Consulting is here.
Our expertise will help you easily identify consumer trends, track performance metrics, optimize campaigns & more – so you can maximize profits quickly! Contact us today.
Step 3: Add the GA4 Tracking Code to Your Website Next, add the GA4 tracking code to your website. You can find the tracking code in your GA4 property under “Admin > Data Streams > Web Data Stream > Measurement ID”. Copy the code and add it to your website, either by adding it directly to the HTML of your site or by using a tag management solution like Google Tag Manager. Install code directly on the website: Admin > Data Stream > View tag instructions > Install manually 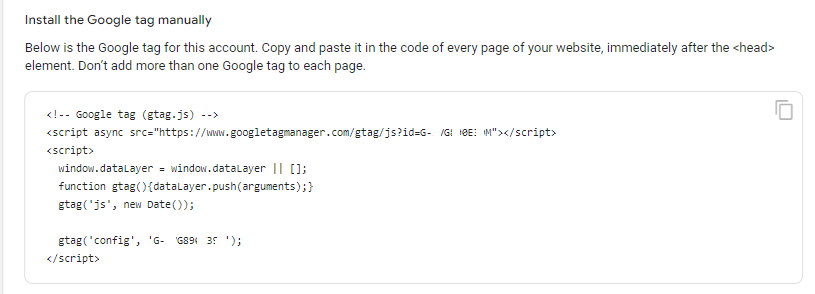
Notes: Code should be Installed just after starting tag as per instructions.
Step 4: Install Google Tag Manager (GTM) Login to Google Tag Manager Account. Create a New account if you don’t have a GTM account. Now go to your account setting > Install google tag manager > copy code and paste as per instructions. 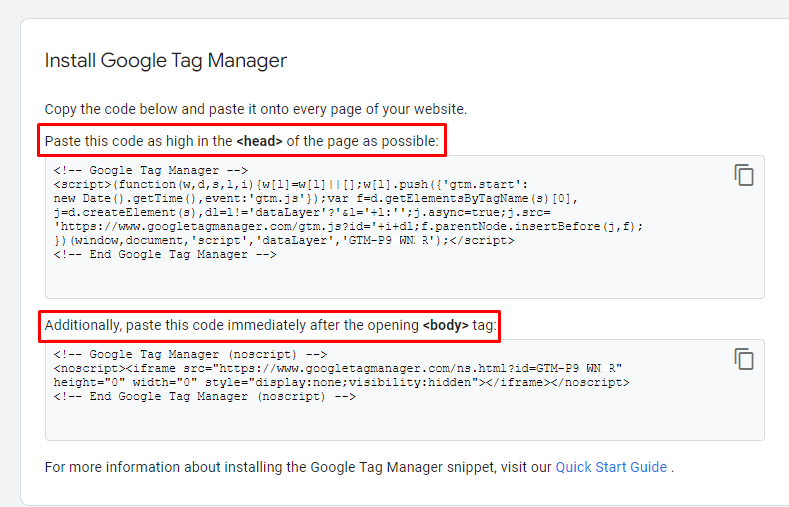
Now, you have to create Events, Tags, Triggers, Parameters, Variables
How to Setup Ecommerce Tracking through Google Tag Manager (GTM) in GA4?
Google Tag Manager (GTM) is a tool that allows you to manage and track various tags on your website, such as Google Analytics, AdWords conversion tracking, and other third-party tracking tags.
To use GTM effectively, it’s important to understand some key terms and concepts, including events, tags, triggers, variables, and parameters.
1. Events: An event in GTM refers to any interaction that takes place on your website, such as a button click, page load, or form submission. Events are used to trigger tags in GTM, allowing you to track specific actions on your site.
2. Tags: A tag in GTM is a snippet of code that performs a specific tracking or marketing function, such as tracking a conversion or displaying an ad. In GTM, you can add and manage multiple tags for your website in one central location.
3. Triggers: A trigger in GTM determines when a tag should fire, or execute. Triggers are created by defining a specific event and conditions for when the event should trigger the tag.
For example, you can create a trigger that fires a tag when a user clicks on a specific button on your site.
4. Variables: A variable in GTM is a placeholder for a value that can change. Variables can be used to store information, such as the URL of the current page or the value of a form field.
Variables in GTM can be used in triggers and tags to dynamically track information on your site.
5. Parameters: A parameter in GTM is a value that is passed to a tag or variable. Parameters can be used to provide additional information to the tag or variable, such as the value of a form field or the ID of a product being viewed.
In Google Analytics 4, the parameters used for Purchase Tracking have undergone some changes compared to Universal Analytics.
We use different parameters to pass essential information such as product details, currency, and promotions.
For example, when we wanted to pass a product name in the older Universal Analytics, we used the parameter ‘name.’ However, in GA4, it’s simplified to ‘item_name.’
Similarly, measuring promotions has also seen a change. In Universal Analytics, we used ‘promoClick’ to measure when a user clicked on a promotion link. But in GA4, the new parameter is ‘select_promotion.’
Here is a table highlighting the key differences between the parameters used in GA4 and Universal Analytics:
| No | Google Analytics 4 | Universal Analytics | Description |
| 1 | view_promotion | promoView | When a user views a promotion |
| 2 | select_promotion | promoClick | When a user clicks on a promotion |
| 3 | view_item_list | impressions | View of product impressions in a list |
| 4 | select_item | productClick | Click on a product |
| 5 | view_item | detail | View product details |
| 6 | add_to_cart | addToCart | Add product to cart |
| 7 | add_to_wishlist | N/A | Add product to a wishlist |
| 8 | remove_from_cart | removeFromCart | Remove product from the cart |
| 9 | view_cart | N/A | View shopping cart |
| 10 | begin_checkout | checkout | Initiate the checkout process |
| 11 | add_shipping_info | checkout_option | Add shipping info during the checkout |
| 12 | add_payment_info | checkout_option | Add payment info during the checkout |
| 13 | purchase | purchase | Purchase product |
| 14 | refund | refund | Refund product |
| 15 | item_id | id | Product ID / SKU |
| 16 | item_name | name | Name of the product |
| 17 | item_list_name | list | Product list name |
| 18 | item_list_id | N/A | Product list identifier |
| 19 | index | position | Product position in the list |
| 20 | item_brand | brand | Product brand |
| 21 | item_category | category | Product category |
| 22 | item_category_2 | category | Product category 2nd level |
| 23 | item_category_3 | category | Product category 3rd level |
| 24 | item_category_4 | category | Product category 4th level |
| 25 | item_category_5 | category | Product category 5th level |
| 26 | item_variant | variant | Product variant name or description |
| 27 | affiliation | N/A | The store affiliation |
| 28 | discount | N/A | Any discount on product |
| 29 | coupon | coupon | Coupon code used |
| 30 | price | price | Product price |
| 31 | currency | N/A | User currency |
| 32 | quantity | quantity | Product quantity |
| 33 | promotion_id | id | Promotion ID |
| 34 | promotion_name | name | Promotion name |
| 35 | transaction_id | id | Unique ID for the transaction required for purchase and refund events |
| 36 | value | revenue | Product revenue |
| 37 | shipping | shipping | Shipping charges for selected product in the cart |
| 38 | payment_type | option | The payment method sent with add_payment_info |
If you haven’t updated your Ecommerce Tracking parameters from Universal Analytics to GA4 yet, now is the perfect time to do so.
These parameter changes in GA4 offer improved tracking capabilities, providing more accurate and valuable insights into your ecommerce activities.
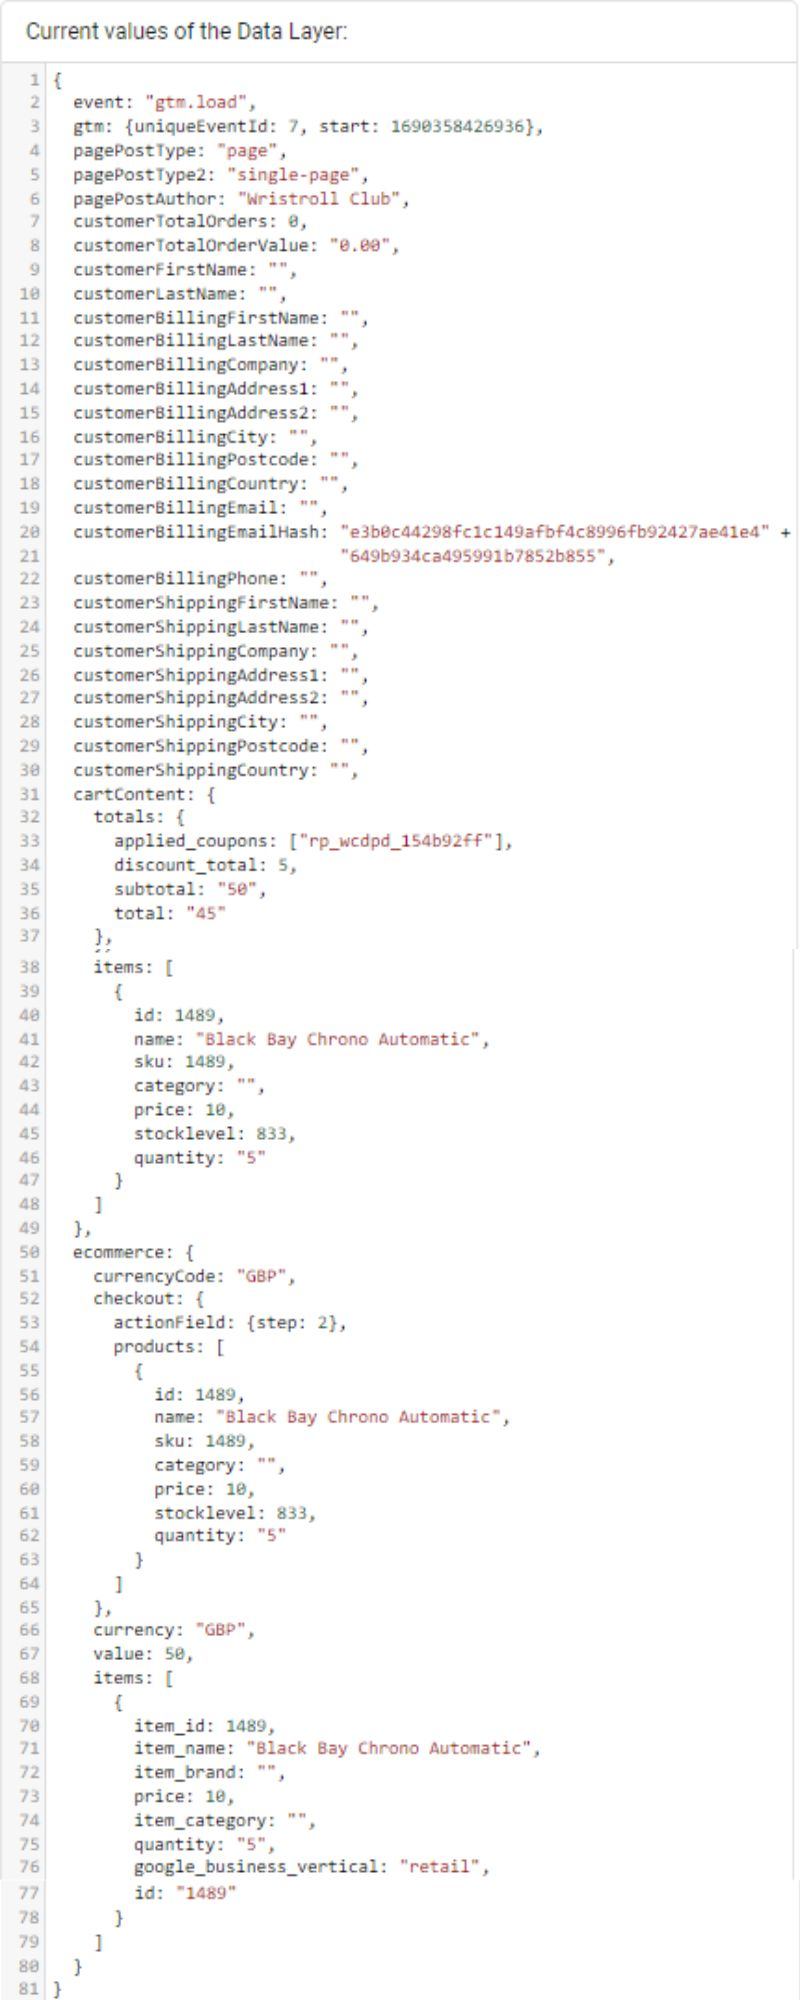
6. Data Layer Implementation: The data layer is a JavaScript object that is used to pass information from a website to your Google Tag Manager.
It contains information about user interactions or activities, such as product details, transaction IDs, or the value of specific actions.
In Universal Analytics, data layer implementation involves manually pushing data to the data layer using custom JavaScript code.
In GA4, data layer implementation is simplified, and it requires the Measurement Protocol to send data directly to Google Analytics, providing enhanced tracking capabilities and improved compatibility.
For a seamless transition, it’s essential to understand these data layer requirements before proceeding with the setup.
Google Documentation on Google Tag Manager
Now follow the following steps to set up your Ecommerce Tracking:
Step 1: Login into GTM Account
Step 2: Create GA4 Event Name Tag – GA4 Configuration Tag Configuration – Google Analytics: GA4 Configuration Triggering – All Pages

Step 3: Go to variables and Click to New to create new variables 

Step 4: Create a list of variables as shown below Variable list and Data Layer Name Variable name – (GA Ecommerce Item List ID) Data Layer Name – (item_list_id)

Similarly, create the Following variables and Data Layer Names:
Variable name – (GA4 Ecommerce Affiliation) Data Layer Name – (ecommerce.affiliation)
Variable name – (GA4 Ecommerce Coupon) Data Layer Name – (ecommerce.coupon)
Variable name – (GA4 Ecommerce currency) Data Layer Name – (ecommerce.currency)
Variable name – (GA4 Ecommerce Item List Name) Data Layer Name – (item_list_name)
Variable name – (GA4 Ecommerce Items) Data Layer Name – (ecommerce.items)
Variable name – (GA4 Ecommerce Shipping) Data Layer Name – (ecommerce.shipping)
Variable name – (GA4 Ecommerce Tax) Data Layer Name – (ecommerce.tax)
Variable name – (GA4 Ecommerce Transaction ID) Data Layer Name – (ecommerce.transaction_id)
Variable name – (GA4 Ecommerce Value) Data Layer Name – (ecommerce.value)
Variables to be created:

Step 5: Create a list of Trigger as shown below Trigger name – GA4 Add To Cart Event Name – add_to_cart 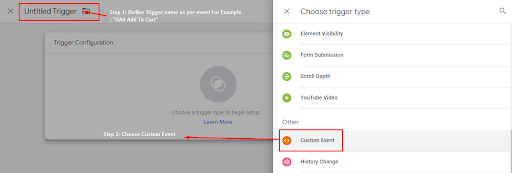

Similarly, create the following triggers
Trigger name – GA4 Begin Checkout Event Name – begin_checkout
Trigger name – GA4 E-commerce Item List ID Event Name – item_list_id
Trigger name – GA4 Ecommerce Products Impression Event Name – view_item_list
Trigger name – GA4 E-commerce Refund Event Name – refund
Trigger name – GA4 Product Clicks Event Name – select_item
Trigger name – GA4 Purchase Event Name – purchase
Trigger name – GA4 Remove From Cart Event Name – remove_from_cart
Trigger name – GA4 View Item Event Name – view_item
Triggers to be created:

Step 6: Tags to be created:
Create a List of Tags as suggested below
1. Tag Name – All Page Click Tag Configuration – GA4 Configuration Trigger Name – All Pages 

Similarly, create the following tags:

2. Tag Name – All Page Initialization Tag Configuration – GA4 Configuration Trigger Name – Initialization – All Pages
3. Tag Name – All Page View Tag Configuration – GA4 Configuration Trigger Name – All Pages
4. Tage Name – GA4 Add To Cart Tag Type – GA4 Event Configuration Tag – GA4 Configuration Event Name – add_to_cart Event Parameter & Value – In ‘value’ select variables Trigger – Select Trigger ‘GA4 Add To Cart’ 

Similarly, create the following Tags-
5. Tag Name – ‘GA4 Begin Checkout Tag Type – GA4 Event Configuration Tag – GA4 Configuration Event Name – begin_checkout Event Parameter & Value – In ‘value’ select variables Trigger – Select Trigger ‘GA4 Begin Checkout More Settings – Send Ecommerce Data

6. Tag Name – ‘GA4 E-commerce Item List ID’ Tag Type – GA4 Event Configuration Tag – GA4 Configuration Event Name – item_list_id Event Parameter & Value – In ‘value’ select variables Trigger – Select Trigger ‘GA4 E-commerce Item List ID’ More Settings – Send Ecommerce Data

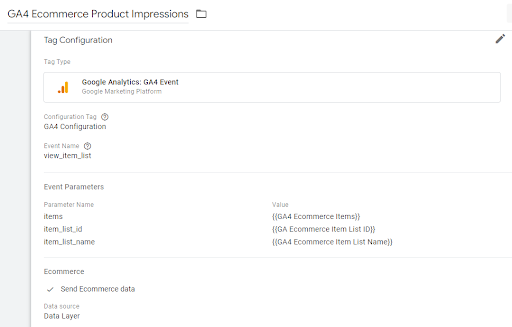
7. Tag Name – ‘GA4 E-commerce Product Impressions’ Tag Type – GA4 Event Configuration Tag – GA4 Configuration Event Name – view_item_list Event Parameter & Value – In ‘value’ select variables Trigger – Select Trigger ‘GA4 E-commerce Product Impressions’ More Settings – Send Ecommerce Data
8. Tag Name – ‘GA4 E-commerce Purchase’ Tag Type – GA4 Event Configuration Tag – GA4 Configuration Event Name – purchase Event Parameter & Value – In ‘value’ select variables Trigger – Select Trigger ‘GA4 Purchase’ More Settings – Send Ecommerce Data 
9. Tag Name – ‘GA4 E-commerce Refund’ Tag Type – GA4 Event Configuration Tag – GA4 Configuration Event Name – refund Event Parameter & Value – In ‘value’ select variables Trigger – Select Trigger ‘GA4 E-commerce Refund’ More Settings – Send Ecommerce Data

10. Tag Name – ‘GA4 Product Clicks’ Tag Type – GA4 Event Configuration Tag – GA4 Configuration Event Name – select_item Event Parameter & Value – In ‘value’ select variables Trigger – Select Trigger ‘GA4 Product Clicks’ More Settings – Send Ecommerce Data 

11. Tag Name – ‘GA4 Remove From Cart Tag Type – GA4 Event Configuration Tag – GA4 Configuration Event Name – remove_from_cart Event Parameter & Value – In ‘value’ select variables Trigger – Select Trigger ‘GA4 Remove From Cart More Settings – Send Ecommerce Data

12. Tag Name – ‘GA4 View Cart Tag Type – GA4 Event Configuration Tag – GA4 Configuration Event Name – view_cart Event Parameter & Value – In ‘value’ select variables Trigger – Select Trigger ‘GA4 View Cart More Settings – Send Ecommerce Data 
13. Tag Name – ‘GA4 View Item’ Tag Type – GA4 Event Configuration Tag – GA4 Configuration Event Name – view_item Event Parameter & Value – In ‘value’ select variables Trigger – Select Trigger ‘GA4 View Item’ More Settings – Send Ecommerce Data 
Step 7: Verify Your Ecommerce Tracking Setup Once you’ve added the ecommerce tracking code to your website, it’s a good idea to verify that everything is set up correctly. To do this, you can use the GA4 Debugging and Verification tool.
This tool allows you to preview the data being sent to GA4 and see if there are any issues with your tracking setup.
Step 8: View Your Ecommerce Data in GA4 Finally, once your ecommerce tracking is set up and verified, you can start viewing your ecommerce data in GA4. Go to the “Reports” section of your GA4 property and select “Ecommerce” from the left-side menu.
You can then view various ecommerce reports, such as revenue, conversion rate, average order value, and more.
In conclusion, setting up purchase tracking in GA4 is a straightforward process that provides valuable insights into your business performance and customer behavior.
By following the steps outlined in this guide, you can easily track your online sales and make data-driven decisions to grow your business.
Ecommerce Reporting in GA4
After successfully setting up the ecommerce for your GA4 property, take some time to allow the data to be generated before proceeding to access the reporting interface.
To access the ecommerce reports for your GA4 property, simply click on ‘Monetization’ in the reporting menu.

Next, click on ‘Monetization Overview’ to access the relevant reports.

Now you will see a collection of trends and tables presenting essential details such as ‘Total Revenue,’ ‘Total Buyers,’ and ‘Average Purchase Revenue per User.

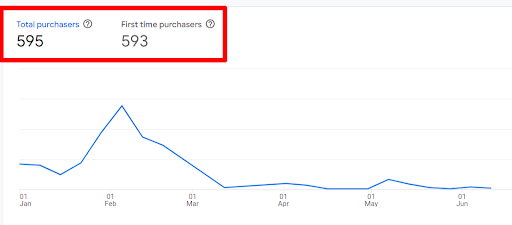
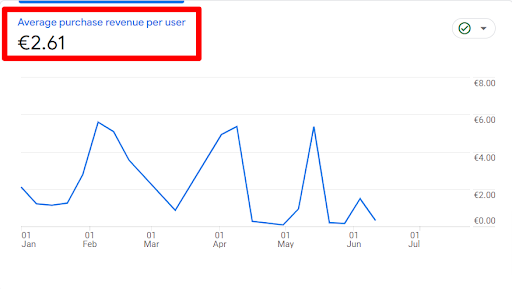
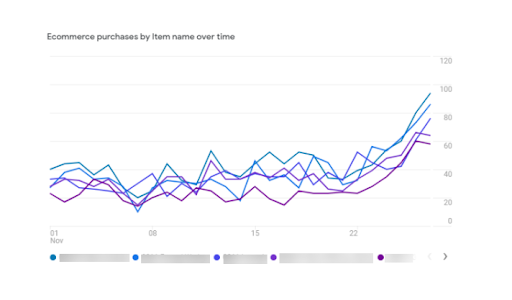
For a more comprehensive report, navigate to the reporting menu and click on ‘Ecommerce Purchases.

You will get a detailed report like the one below.


This is how you can set up ecommerce tracking in a Google Analytics 4 property.
Also Read: How and Why to upgrade to GA4 from Universal Analytics?
Need expert guidance on setting up ecommerce tracking in Google Analytics 4 for your business? We’re here to help!
Contact us today for personalized support and ensure you’re making the most of your analytics data. Click here to get Free Consultation
Struggling to Increase Your Website Traffic? Discover How Our Experts Can Help!
Say goodbye to traffic struggles and hello to exponential growth.
Schedule a consultation today and let our experts guide you towards website success!
Book a CallI hope you enjoyed reading this blog post.
If you want to increase your website traffic by 2X, 4X, 6X, and even 10X, Book a Call.